Friday 14 June 2013

13/06/2013 GBP/CHF Short (Loss)


Another FTB setup, this time on GBP/CHF off the H1 timeframe. Here's the entry chart (click to enlarge). Risk was 0.5% of account.


and here's the exit chart showing price going up and taking out my stop, pretty much straight away.


Analysis: The supply area from which price originally dropped wasn't the clearest and the move down wasn't the strongest either, maybe it wasn't the best trade to take, but I risked only 0.5% on it.  

13/06/2013 NZD/CHF Short (Loss)


Another FTB trade. Here's my entry chart (click to enlarge). Risk on this was only 0.5% of account.


and here is the exit chart showing price moving straight up through the former supply area and taking me out for a loss.


Analysis: At this point in time I don't think this was a bad setup. Yeah it wasn't perfect, but that's why I only risked 0.5% on the trade. Not much more to say. It failed. 

Wednesday 12 June 2013

12/06/2013 EUR/CAD Short (Loss)


Was triggered into this trade on Monday. Here is the entry chart (click to enlarge). Risk was 1%.


Here's the exit chart. I just cut this trade for a reduced loss because there was no strong momentum down after the BEOB. Intraday it was up and down more times than a whore's drawers. Piece of shit pair. It's crazy this Canadian dollar. No wonder they call it the looney.


Analysis: BEOB at a swing high? Weekly pin bar? I mean, I mean, eh, eh, eh, it looked good but let me ask a second opinion to be sure. "yeah it looked a good setup, double top with divergence". Okay then...........okay............I can conclude it was a good setup. It just decided to be a hoe trade.  


12/06/2013 NZD/JPY Short (Win)


Here's a quick trade I took off the H4 timeframe. I set a limit order to short at 77.33 due to the first time back to the supply area. I risked 1% of my account on this trade. 


and here's the exit chart. As you can see price went into the area, formed a bearish pin and from there it just went downwards and hit my target. I made just over 2.25% on this trade, so over two times what was my risk, so it's a great result. 


Analysis: Good trade taken off a well defined area, nice stop loss placement. The only thing I could have done differently is maybe let it run just a little bit more and taken more profit, but these things will come with experience. Hours and hours of chart watching, trading and analyzing won't go to waste. 


10/06/2013 USD/JPY Short (Break even)


Another FTB setup. This time the area was a lot better defined than the last trade I took. Here's the entry chart (click to enlarge). Risk was 0.5% off account.


and here is the exit chart with explanation of what happened.


Analysis: Good setup, good entry, but trade management can be looked at either way. Had I not moved my stop loss, I would have made a profit on this trade instead of closing at break even, but it's easy to say that after the fact. Had I taken a loss I could have said "oh I should have moved my stop to break even". Maybe it was poor trade management to move stop, I don't know. It's a tough one. 

10/06/2013 NZD/JPY Short (Loss)


Another FTB setup off the H4 timeframe. Here's my entry chart (click to enlarge). Risk was 0.5%.


and here is the exit chart showing price going up and taking out my stop. 


Analysis: Visually, the supply area I traded doesn't look great. There's another one just above that is much more well defined and as you can see, price hit that area and then went down. Easier said with hindsight I know. 


10/06/2013 USD/CHF Short (Win)


Here's my entry chart for this FTB setup off the H4 timeframe. Click chart to enlarge. Risk was 0.5%.


and here is the exit chart which shows price going down and hitting my profit target. On this trade I made a 0.5% gain.


Analysis: Good trade, nice entry, hardly any drawdown. The only criticism is that I could have let the trade run a bit and taken a higher profit, but on the whole I was happy with this trade. 


07/06/2013 GBP/NZD Short (Loss)


Here is my entry chart for this short trade on GBP/NZD. Click chart to enlarge. Risk was 1%.


I held this chart over the weekend and the market gapped up and took out my stop. 


Analysis: Looked a good setup, can't see anything wrong with it at this time. For now I'll just have to accept that sometimes even the good ones can fail. 

Monday 10 June 2013

05/06/2013 GBP/USD Short (Loss) Dumbass trade


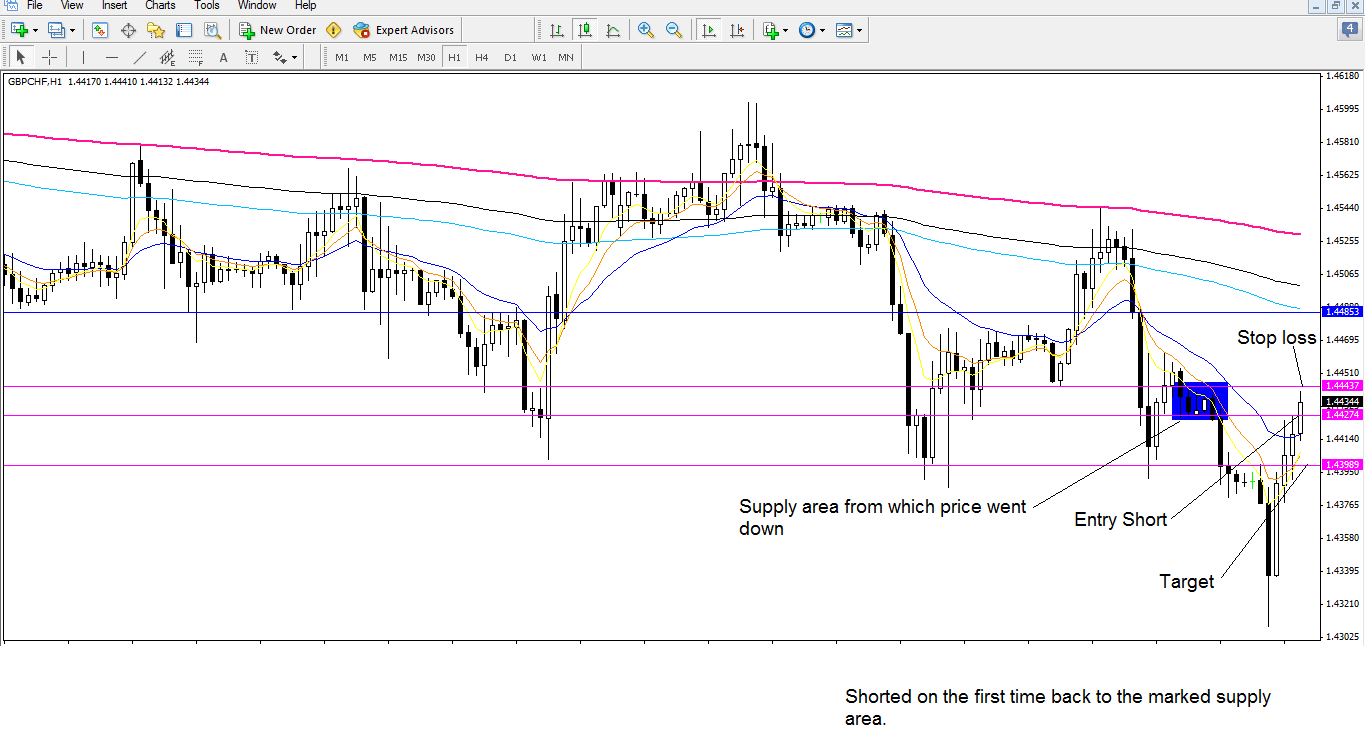
I'm trading pinbars and PA bars less and less these days. Not because there's anything wrong with them but I'm moving more towards supply/demand trading. Anyway, here is a joke of a pinbar trade I took. Here's the entry chart explaining my reasons to short. Click chart to enlarge. Risk was 1%.


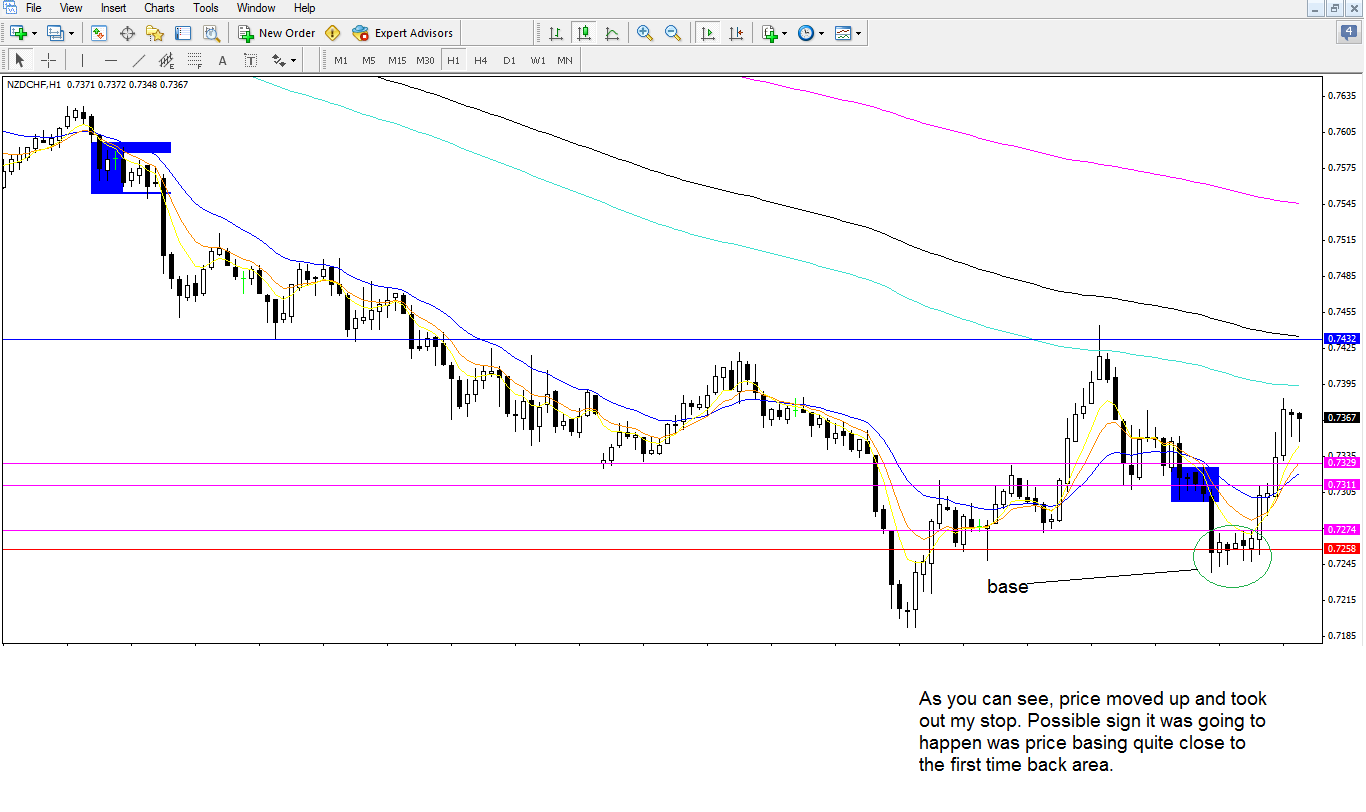
and here is the exit chart showing the pinbar failing. One thing you don't do is sell into support or buy into resistance, and that's exactly what I did. I sold into support. I don't know why I missed those bar highs before placing the order. Not only that, but once I was triggered short I done realised my mistake and even had a chance to cut the trade for a small profit/break even. Like an idiot I decided to leave it alone and deservedly got taken out for a full loss. 


Analysis: Not much more I can add to what I've already said about this trade. Shouldn't have shorted it, my entry was okay because at least I entered on a retrace, but trade management was a big fuck up 'cause  I KNEW I had made a mistake, the market gave me a life line to exit the trade at break even or even a small profit and I STILL held on because I was greedy and ended up paying for it. The only good thing about this is that I can see where I went wrong. Whenever I lose a trade I always like it when I can see something obvious that I did wrong. This way I have something to improve on, and therefore better my performance. I'd much rather that than to lose a trade and not see anything wrong with the setup in hindsight. That shit happens though, sometimes even a great setup can fail, but this was anything but a great setup. 


Sunday 9 June 2013

04/06/2013 USD/CAD Short (Win)


Here is my entry chart for this short trade off the H4 timeframe. This time I zoomed into M5 to tighten my stop. Risk was 1% of the account. Click chart to enlarge.


and here is my exit chart showing price going down and hitting my profit target. The gain was just under 1%.


Analysis: Good setup and trade. I was able to zoom in and tighten my stop, and this time I just let the trade hit my profit target instead of being a punk and closing it manually too early. There was very little draw down on this trade and it just moved down quickly like I wanted it to.


04/06/2013 EUR/NZD short (loss)


Here is my entry chart for this FTB short trade (click to enlarge). Risk was 1% of the account.


and here is the exit chart showing price moving up and taking out my stop loss, which I had moved down for a reduced loss. Loss was less that 0.5% off account. Had I left it alone I would have lost 1%. Note: The exit chart shows the H1 timeframe while entry was off the H4.


Analysis: At this point I don't see much wrong with the setup. It doesn't look like the greatest setup visually, but it doesn't look bad either. Right now I just accept it was one of those trades that was worth a shot but failed. 


03/06/2013 EUR/USD long (loss)


This was another FTB setup off the M30 timeframe. I zoomed into the M1 timeframe to tighten my stop. Here is the entry chart (click to enlarge). Risk was 1% of account.


and here is the exit chart which shows price just balling down like a twat and taking me out for a loss.


Analysis: The actual demand area looked decent to me with a good, if not spectacular move up from it so I was expecting the first time back to it to hold and give me a nice move up. It didn't happen obviously, but do I feel it's a bad trade? Not at this moment. Maybe in a few months when I've got more experience with this style of trading I might have a different answer but as of now I still feel it was a trade worth taking. 


03/06/2013 GBP/CHF long (win)


Here is my entry chart for this long trade due to a BUOB which closed above a horizontal level. Click chart to enlarge. Risk was 1% of the account.


and here is the exit chart. Once again I took profit early instead of letting it just hit the target, which it would have had I left it along. I made just under a 1% gain.


Analysis: The BUOB was not at a swing low so I don't think this was a perfect setup to begin with. I still took a long trade because it closed above a horizontal level and was much larger than the bar it engulfed. These days I enter on retraces of bars like these because for me it works much better. I'm not saying it's a better way, but it suits my personality. Trade management was okay but not great because like I said, I took profit too early. Still, just under a 1% gain is not a bad result at all so I'll take it. 

03/06/2013 AUD/USD (win)


Another FTB setup, this time off the H1 timeframe with the M1 timeframe used to tighten stop. Here's the entry chart (click to enlarge).


and here is the exit chart. I took profit on this trade but earlier than I should have. Had I left it alone it would have hit my target and I would have made a bigger gain. I made a 0.5% gain on this trade.


Analysis: Good trade. I was close to being stopped out but that happens when you have a really tight stop. I zoomed into the M1 and tightened the stop like a boss. The only thing I did wrong on this one was closing the trade early manually instead of just allowing it to hit my target. That way my profit would have been larger, but hey, I'll learn (after making the same mistake around 500 more times probably!).